In this step-by-step guide I will describe how you can enable secure XML traffic on a Xenapp Delivery Controller. After these steps it’s possible to select HTTPS as transport type when adding a Delivery Controller to a store in StoreFront. I have tested this on XenApp Delivery Controller and StoreFront 7.6 FP3.
References
http://support.citrix.com/article/CTX200415
Preparations
- Delivery Controller and StoreFront servers installed
- Store on StoreFront server configured
- WebServer-based certificate or a WebServer-template to request a certificate for your Delivery Controllers
- Administrator privileges are required
Notes and considerations
- A WebServer-based certificate will expire every 2 years so the binding has to be done again every 2 years
- After upgrading the Delivery Controller(s) the binding has to be done again after the upgrade.
Table of contents
- Add certificate to Citrix Delivery Controller
1.1 Import a certificate
1.2 Request and import a certificate - Bind certificate to Citrix Broker Service
- Unbind certificate
- Enable secure XML traffic
1. Add certificate to Citrix Delivery Controller
The first step is to add a WebServer-based certificate to the Citrix Delivery Controllers. This can be a wildcard certificate (e.g. *.derksen.local) if you have multiple Delivery Controllers and only want to use one certificate. Otherwise you will need a personal certificate for your Delivery Controller(s) (e.g. ddc01.derksen.local).
You can import (cer-file) or request and import a certificate based on a WebServer-template. I will not describe how to create a certificate but i will describe how-to import the certificates.
1.1 Import a certificate
You will need a WebServer-based certificate from your Certification Authority (CA) for your Citrix Delivery Controller(s). Double click the certificate file, click Install Certificate, select Local Machine and click Next. Select Place all certificates in the following store and select the Personal store. Click Next, click Finish and click OK.
1.2 Request and import a certificate
You will need a WebServer-template on your Certification Authority (CA) and give the Computer Account objects in Active Directory the required permissions to request the certificate based on this template.
Open on the Delivery Controller MMC with the Certificate snap-in. Open Personal > Certificates.

Right click > All Tasks > Request New Certificate. Click Next > Next.

Select your WebServer-based template. Click Properties. Open tab General. Insert a friendly name (e.g. FQDN controller01.derksen.local). Open tab Subject. Select Common name and fill in your FQDN, click Add. Select DNS and fill in your FQDN, click Add. Click OK, click Enroll
2. Bind certificate to Citrix Broker Service
Open on the Delivery Controller MMC with the Certificate snap-in. Open Personal > Certificates. Double click the imported or requested certificate.

Open tab Details. Scroll down and select Thumbprint. Remember this thumbprint.
Open the registry and navigate to:
[HKLM\SOFTWARE\Microsoft\SystemCertificates\MY\Certificates]

Copy the remembered thumbprint.

Paste the thumbprint in Notepad. Open the registry and navigate to:
[HKEY_CLASSES_ROOT\Installer\Products]
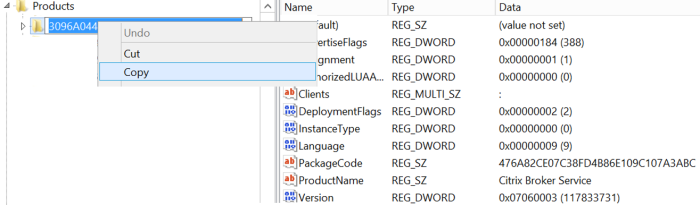
There is a list of GUIDs here. Select every GUID (or search) and find the GUID belonging to the Citrix Broker Service as you can see in the example above. Copy the GUID.

You will have to edit the Citrix Broker Service GUID and seperate it in this format:
8-4–4-4–12. So it will start with 8 characters, then minus, then 4 characters and so on.
Add this commandline to Notepad:
netsh http add sslcert ipport=###:443 certhash=### appid={###}

Edit the line where ipport is your Citrix Delivery Controller IP you are working on right now, certhash is the first thumbprint we copied and appid is the Citrix Broker Service GUID with the minus characters.
Copy the commandline. Run the Command Prompt as an administrator and run the commandline.

You can check your binding with the command: netsh http show sslcert.
If you have more Citrix Delivery Controllers you will have to run the same steps.
3. Unbind certificate
When the certificate is about to expire or you have upgraded the Citrix Delivery Controller you will have to bind the certificate again. But first you will need to remove the previous binding. The command to remove the binding: netsh http delete sslcert ipport=###:443
Were ipport is the IP address of the Citrix Delivery Controller you are working on.
4. Enable secure XML traffic
After the binding on the Citrix Delivery Controller we can secure XML traffic. Log on your StoreFront server and start the StoreFront console.
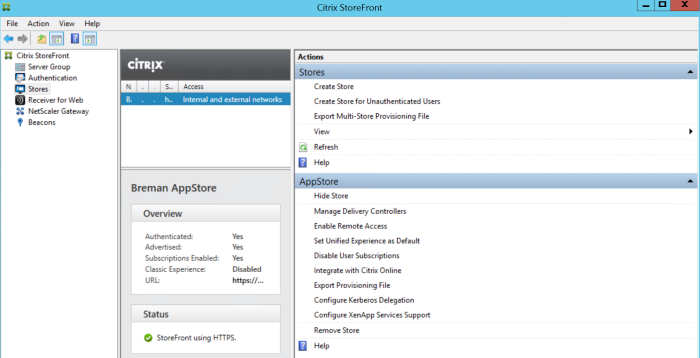
Navigate to Stores > select store > Manage Delivery Controllers

Select the Citrix Delivery Controller for the Store and click Edit. Select HTTPS under Transport type. Click OK, click OK.
That’s it.
